

After using part of a pallet to make a huge grow-bag tray, I tried my luck at making a planter for my fence using pallet scraps.
I love vertical gardening. And since I have many meters of chain link fence, I am especially excited to explore ways to grow food up high and out of my chickens' reach - especially the mischievous pubescent ones.

It didn't take much imagination to turn a left-over part of a pallet into a vertical planter.
There was a long rectangular piece that ached to be covered by scrap pallet wood on either the top or bottom to turn it into a container. I chose to cover the bottom part, as seen in the picture below. And then I put the planter on top of my chain-link fence to see what type of support I would need.

The long pieces of wood served to balance the planter on top nicely, though it was obvious that it would need extra support.
When I decided to secure the planter using wire, I also decided to cut one-foot off of each board, leaving only about a six inch protrusion of the boards. I decided to start collecting one-foot boards to try other planter projects in the future.

After completing the carpentry, I placed some left-over scraps of landscape fabric on the bottom of the planter. This is to help keep the potting mix from seeping out during watering.

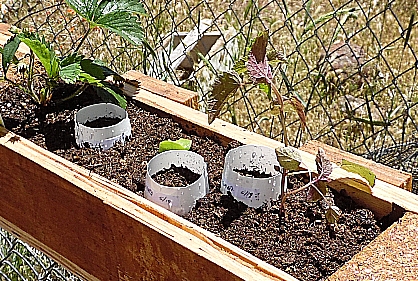
Next, I filled it up with my homemade potting mix and added a few plants to test the efficiency of the planter.
I planted Korean mint on the far right and left sides and a couple of strawberry plants in the middle.
In the middle of each of the two sections, I planted some mystery seedling that lost its popsicle stick label. I think its lettuce, but time will tell. (Located on the far ends of the picture below.)

Next, I intermingled the planter with some herb seeds to see what grows. To protect the seeds, I cut the bottoms off of small plastic cups and filled them upside-down with a homemade seedling potting mixture. By placing the cups upside-down, I hope it will be easy to remove them when the seeds grow. I placed the seeds symmetrically - basil, oregano, and cilantro.
This was a really fun project and one that got my creative juices flowing. Plus, this was the first time that I ever used an electric jigsaw tool.
I envision making several of these types of planters and making them more aesthetically pleasing by using paint, distressing, and maybe doing a few in the opposite direction so that I could use longer protruding boards as trellises or to decorate. Another idea is that I could place small grow-bags that can be changed as needed to accommodate the various seasons. Or how about an herb planter for my deck, closer to my kitchen. The possibilities are endless and exciting!
I hope you enjoyed this blog post. Please share your comments below and check back to see other projects that I share.
Thanks for checking this out.
TigerLily
Download over 16,000 WOODWORKING Plans at here
ReplyDeletehttp://woodworkingplanspro.weebly.com
Woodworking guide offers anyone of any skill level the ability to build amazing projects. The guide is extra helpful because it offers more detailed explanations, videos and blueprints then your typical woodworker magazine.
Arbor Projects ,
Adirondack Chairs ,
Artwork Display ,
Bathroom Unit ,
Box Designs ,
Billiard/Pool Table ,
Barn Plans ,
Bed Plans ,
Bedside Cabinets ,
Bee Hive Plans ,
Bench Projects ,
Bird Feeders ,
Birdhouse Plans ,
Boat Plans ,
Book Case Plans ,
Baby Changing Table ,
Coat Rack ,
Cabin Plans ,
Cabinet Plans ,
Carport Plans ,
Cart Plans ,
Cat House Plans ,
CD/DVD Holder ,
Cellar Projects ,
Chair Plans ,
Chest Designs ,
Chicken Houses
Childrens Room Plans ,
Clock Plans ,
Coasters ,
Coffee Table Designs ,
Cold Frame Plans ,
Compost Bin ,
Computer Desk ,
Containers ,
Cradle Projects ,
Small Crafts ,
Cutting Board ,
Deck Plans ..
Hope it will help you next time !